Fax2Send
Installation Instructions
I'm going to To setup and install Fax2Serve you need to complete the
following steps:
- Install and configure Fax2Serve
- Install and configure the OS.
- Install Java 1.3.1 or greater.
- Install Fax2Send.
- Configure Fax2Send.
- Setup Fax printer.
- Test sending a fax.
- Automate Fax2Send startup.
Install and configure Fax2Serve
- Follow the instructions for installing Fax2Serve
first.
Install and configure OS.
I have been installing Fax2Send on Red Hat Linux and Windows XP. Here are my
recommendationsRed Hat Linux.
- Install X-Windows Gnome or KDE.
- Verify that TCP/IP networking is installed and working.
Windows XP
- Verify that TCP/IP networking is installed and working.
Install Java 1.3.1 or greater (if needed).
Red Hat Linux
- Download Sun's Java 1.4.x from
http://java.sun.com. (I've been using the latest 1.4.2 with no problems.)
-
Install the JVM. After installing,
modify the .bash_profile in your user directory to set the JAVA_HOME
environment variable and put the JAVA executables in the path. Your
.bash_profile may look something like this:
- # .bash_profile
- # Get the aliases and functions
- ...
- # User specific environment and startup programs
- JAVA_HOME=/usr/java/j2sdk1.4.2
- PATH=$JAVA_HOME/jre/bin:$JAVA_HOME/bin:$PATH:$HOME/bin
- BASH_ENV=$HOME/.bashrc
- USERNAME="root"
- export USERNAME BASH_ENV PATH JAVA_HOME
- Log out and log back in to setup your environment, and then test
to see if Java is working as needed. After typing in the following
command you should see the following:
- java -version
- java version "1.4.2"
- Java(TM) 2 Runtime Environment, Standard Edition (build
1.4.2-b28)
- Java HotSpot(TM) Client VM (build 1.4.2-b28, mixed mode)
Windows XP
- Download Sun's Java 1.4.x from
http://java.sun.com. (I've been using the latest 1.4.2 with no problems.)
- Install the JVM and reboot if needed.
Install Fax2Send.A - Install using Install Anywhere
executable:
- Verify Java environment (if you are going to download the Fax2Serve
without the Java VM).
- For Linux, download fax2send20031024LinuxNoVM.bin (or fax2send20031024LinuxVM.bin if you didn't
configure Java manually) from http://sourceforge.net/projects/fax2serve/
into the /opt/ directory. Use the chmod command to make the bin file executable file (ie. chmod +755
fax2serve*).
- For Windows, download fax2send20031024WinNoVM.exe (or
fax2send20031024WinVM.exe if you didn't configure Java manually) from http://sourceforge.net/projects/fax2serve/
into a convenient download directory.
- Run the downloaded installer executable
- For Linux, select to have the application installed to the /opt/fax2send/
directory and have the startup script installed to the /opt/ directory.
- For Windows, let the application be installed to the default directory,
but I recommend having the icons installed as viewable for all users.
- Run the fax2serve script or batch file which will setup the Java class
path and start the application.
B - Install using platform independent archive:
- Verify Java environment.
- For Linux, download fax2send20031024.tgz from http://sourceforge.net/projects/fax2serve/
into the /opt/fax2send directory.
- For Windows, download fax2send20031024.zip from http://sourceforge.net/projects/fax2serve/
into a convenient download directory.
- For Linux, decompress using gzip (ie. gzip -d fax2send2003*).
- For Linux, extract the archive using the tar (ie. tar -xvf
fax2send20031024.tar).
- For Windows, decompress using Winzip, PKZip, etc. into "c:\program
files\fax2send\" directory.
- Run the fax2send script or batch file which will setup the Java class path
and start the application.
Configure Fax2Send for your workstation.
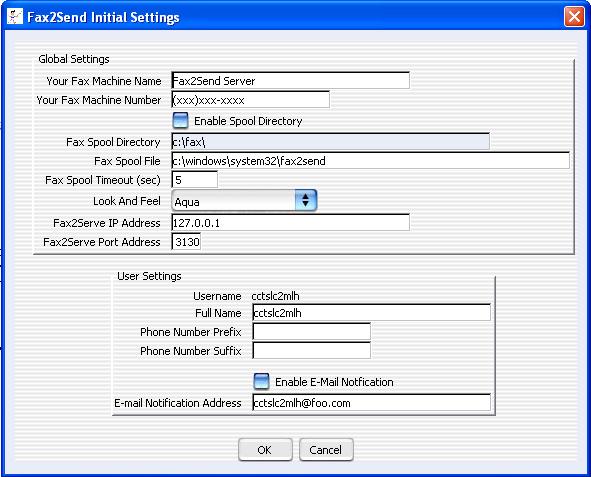
- The first time you start Fax2Send a pop-up screen will notify you that you
need to configure your settings as shown below.
- Global Settings
- Your Fax Machine Name: This is the name of your fax machine that will
appear on the header of faxes you send.
- Your Fax Machine Number: This is the number of your fax machine that
will appear on the header of faxes you send.
- Enable Spool Directory: Enabling this option changes Fax2Send to poll
for any new files in the Fax Spool Directory instead of checking for the
existence of the Fax Spool File.
- Fax Spool Directory: Fax2Send will poll this directory for any new files
to fax.
- Fax Spool File: Fax2Send will poll for the existence of this file to
fax.
- Fax Spool Timeout (sec): When any file has been detected for faxing,
Fax2Send will wait the declared amount of seconds for no change to the size
and timestamp of the fax file before trying to send the fax.
- Look and Feel: Selects the Look and Feel for Fax2Send.
- Fax2Serve IP Address: Input the IP address of your Fax2Serve server that
will receive the faxes from your workstation for sending.
- Fax2Serve Port Address: Input the listening port address that your
Fax2Serve server is configured to listen for faxes.
- User Settings
- Username: This is the username detected by Fax2Send on your computer.
- Full Name: This is the display name that will appear on the header of
the faxes you send.
- Phone Number Prefix: This is the prefix to add in front of a phone
number. (For example if you need to dial 9 to get an outside line you could
add 9,, as your prefix.)
- Phone Number Prefix: This is added after a phone number as needed. (For
example if you need to put in a long distance code you could add ,,1234 as
your suffix.)
- Enable E-mail Notification: Enable this to have Fax2Serve send a
notification message when the fax is successfully delivered or a failure
message when the fax is not able to be sent.
- E-mail Notification Address: This is the e-mail address that will
receive the notification message on success or failure of sending a fax.
- Click on the "OK" button to save the settings.
Configure a printer for your applications to use to send faxes:
Linux
- With CUPS printing, start the "Add a new print queue" application.
- Name the print queue fax2send with whatever you want for the description.
- Create a file for the Linux to print to such as the default /fax/fax.ps
file.
- Under the "Queue Type" option, select "Locally-connected" and click on the
"Custom device" button and put in the file name /fax/fax.ps as the device name
- As a driver pick one of the Apple LaserWriters.
- Some applications will now allow you to pick which printer to use, so if
you want to fax you may need to set your new fax2send queue as the default.
- Configure Fax2Send for the "Fax Spool File" option.
Windows 95, 98, Me, NT
- Create a printer with the "Print to File" option as the device.
- Use the Apple LaserWriter Plus as the driver.
- Name the Printer Fax2Send.
- Configure Fax2Send for the "Fax Spool Directory" option.
- When you send a print job to Fax2Send you will need to put in the path and
a file name manually each time. For example if you use the default directory
of c:\fax\ you would create an output file of c:\fax\fax.ps when printing to
the Fax2Send printer.
Windows 2000, XP
- Create a printer and for the device, select "Local printer attached to
this computer".
- On the "Select a Printer Port" screen, use the "Create a new port", select
"Local Port" and when asked to input the port name, use fax2send.
- For the printer drive, use Apple Laserwriter Plus.
- Name the printer Fax2Send.
- Configure Fax2Send for the "Fax Spool File" option. For Windows 2000, you
may need to change the path to c:\winnt\system32\fax2send instead of
c:\windows\system32\fax2send.
Send a test fax:
- Run Fax2Send setup if you need to change any parameters.
- Startup Fax2Send.
- From any application, print to the newly configured Fax2Send printer.
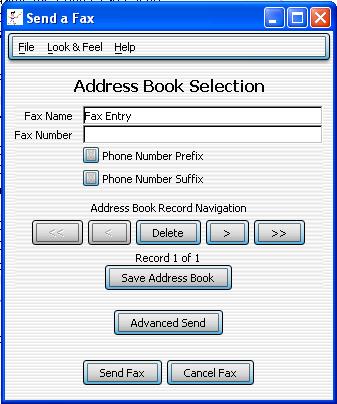
- After the application sends the print job and the spool timeout time has
elapsed, you should get the Fax2Send popup as shown below.
- Enter in the name of the recipient in the "Fax Name" field.
- Enter in the number of the fax recipient in the "Fax Number" field.
- If you need a prefix ahead of the number, click on the "Phone Number
Prefix" check box. If you need a different prefix for just this time, click on
the "Advanced Send" button and enter it in there.
- If you need a suffix after the number, click on the "Phone Number Suffix"
check box. If you need a different suffix for just this time, click on the
"Advanced Send" button and enter it in there.
- The "Address Book" for Fax2Send allows for you to automatically add new
entries by simply clicking on the next (ie. >) button a new record is created.
- If you want to put in a description that will appear on the fax header,
click on the "Advanced Send" button and enter it in there.
- Click on the "Send Fax" button when you are ready to send it to the
server. If your workstation and the server are properly configured, it should
quickly connect and then the Fax2Send popup will close. Upon success you will
get an e-mail from the server if you configured Fax2Send to send you a status
notification.
Automate sending faxes:
Linux
- Currently each user needs to startup Fax2Send when they log in to have the
service available.
Windows
- Simply copy the Fax2Send icon that installed with the automatic installer
or create one in the startup folder on your machine.
- Log out and login again for Fax2Send to startup.
- If you startup the Fax2Send setup and make changes, you will need to kill
and restart the Fax2Send process after exiting setup. In Task Manager you will
see either see Fax2Send (if you used the Install Anywhere installer) or javaw
(if you used the fax2send.bat batch file).
